Bear (C)hipsterizer
In the last post, Building a Deep Learning Computer, we describe the computer we put together for our deep learning projects, which we named Otis. The computer is built around an EVGA GeForce GTX 1070 GPU and an Intel Core i5-6500. It’s a fairly basic system, so perhaps we should have named it after a smaller bear!
Installing Software
In the build post, we mentioned that we installed Ubuntu 16.04 for Desktop. Since then, we’ve been installing various software packages as needed. Since our recent focus has been on the Dlib Toolkit, we started there.
Dlib Toolkit
Dlib is pretty straight forward to download and compile. You can follow the simple instructions on their How to compile page. To run most dlib examples on the CPU, there is really only one prerequisite, cmake. You can get this with apt-get install cmake. Since we had a bare bones Ubuntu install, we also needed to get the X11 development package, sudo apt-get install libX11-dev. To make use of the GPU, you need to get NVIDIA’s CUDA Toolkit and CUDA Deep Neural Network (cuDNN) library libraries. I won’t reiterate the CUDA instructions here. Once you build and install CUDA and cuDNN, the dlib cmake process should be able to find and make use of them.
Performance Comparison (CPU vs GPU)
We ended up building both a CPU-only (before we installed CUDA) and a GPU version of dlib. Our intention was to compare the performance. We decided to use the Deep Learning Max-Margin Object Detection example as our benchmark. The example program trains a CNN based face detector using a small set of training data. We figured this example would make good use of the GPU due to the CNN, and didn’t require downloading a huge dataset.
The example ran on the GPU in about 47 minutes to run 7,268 training steps. The CPU ran a lot slower. To be fair, we did not enable any CPU optimizations (SSE4 or AVX). After about 5 days, the CPU run was at around step 4,000 when we lost power! [Note to self: look into getting an uninterruptible power supply (UPS)!]
We did not bother restarting the test, nor have we tried to rebuild the CPU version with optimizations turned on. For now we’ll just live with conclusion that GPU is faster.
Bear (C)hipsterizer
A couple weeks ago we talked about the Dlib Toolkit and the Dog Hipsterizer example program in our post, Hipster Bears. It turned out, the Deep Neural Network [DNN] trained for the Dog Hipsterizer was pretty good at detecting bear faces as well (we still need to quantify this). It also detected the three key face landmarks we care about, the nose and both eyes. Using this network meant we could skip training our own face and landmark detector, saving us from having to manually annotate a ton of bear images (at least for now).
Starting with the Dog Hipsterizer example code, we modified it to find the faces and landmarks, but skip the hipsterization. We still needed to reorient the face:

Reorienting the Face
From the Modern Face Recognition with Deep Learning post, we know we need to try to make the detected bear face match an optimally centered bear face by utilizing an affine transformation. We reviewed the example code from the blog post and realized it makes use of a OpenFace function:
face_aligner = openface.AlignDlib(predictor_model)
[...]
alignedFace = face_aligner.align(534, image, face_rect,
                  landmarkIndices=openface.AlignDlib.OUTER_EYES_AND_NOSE)
We didn’t want to pull in another library just for face alignment, so we had a look as dlib’s face recognition example. This example uses the following to extract what it calls a face_chip, which is a reoriented version of the face, scaled and cropped to 150x150 pixels:
extract_image_chip(img, get_face_chip_details(shape,150,0.25), face_chip);
The get_face_chip_details function calculates the parameters for the affine transform, however, it it based on a set of average human face landmarks (mean face). Based on the code for this function, we were able to create a similar function for a rudimentary mean bear face. I say rudimentary because the mean human face has 68 points while our mean bear face has only 3 points (the mean face shape constants have 6 points to match the output of the original Dog Hipsterizer network, but 3 are unused). Here’s the C++ code for our bear version of get_face_chip_details:
// x and y coordinates of mean bear face (derrived through trial and error)
const double mean_face_shape_x[] = { 0, 0, 0.62, 0.50, 0, 0.38 };
const double mean_face_shape_y[] = { 0, 0, 0.48, 0.70, 0, 0.48 };

// target chip size and padding
const unsigned long size = 150;
const double padding = 0.0;

// face chip details
chip_details face_chip_details;

// find the transform points
std::vector<dlib::vector<double,2> > from_points, to_points;
for (unsigned long i : {3, 5, 2})  // follow the order from face pose (nose, reye, leye)
{
    dlib::vector<double,2> p;
    p.x() = (padding+mean_face_shape_x[i])/(2*padding+1);
    p.y() = (padding+mean_face_shape_y[i])/(2*padding+1);
    from_points.push_back(p*size);
    to_points.push_back(shape.part(i));
    cout << "from:" << p*size << endl;
    cout << "to:" << shape.part(i) << endl;
}

// calculate the chip_details based on the points and the desired chip dimension
face_chip_details = chip_details(from_points, to_points, chip_dims(size,size));
Extracting the Face
Once we have the face_chip_details, we can generate the final face_chip image:
// extract the face chip
matrix<rgb_pixel> face_chip;
extract_image_chip(img, face_chip_details, face_chip);
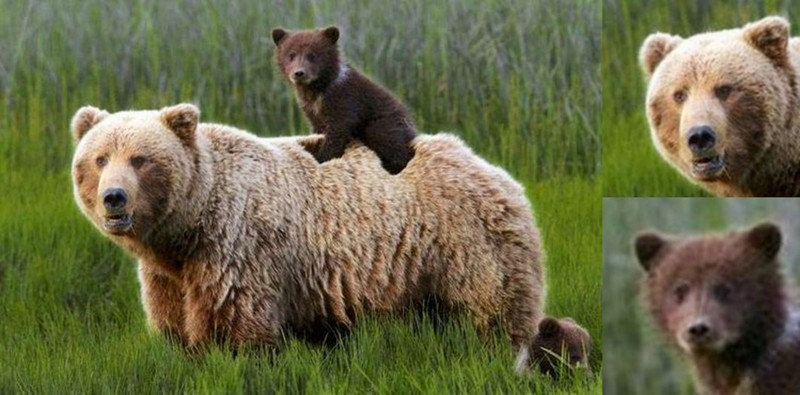
We compiled our code with dlib to make an executable we called bearchip. Running bearchip on a set of images will find all the bear faces in each image and output a 150x150 face chip of each bear. Here’s an example image with the resulting two face chips:
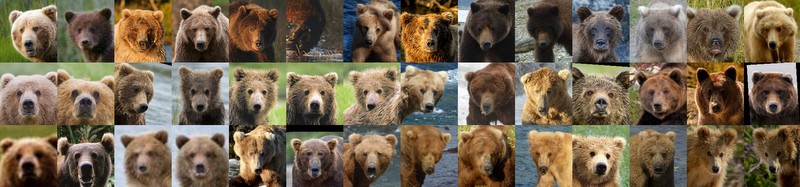
Running it on a small set of images, we get something like these:
Next Steps
With our dlib based bearchip program, we have a first cut at both stage 1 (Find the Face) and stage 2 (Reorient Each Face). To improve accuracy, we will likely need to replace the pre-trained Dog Hipsterizer DNN with one we train on bears. We may also need to improve the reorientation at some point. We can experiment with improving stage 1 and 2 in the future.
For now we will move on to stage 3 (Encode the Face). For that, we need to build up a dataset of images of known bears. As we build up the bear image dataset, we will use bearchip to generate our bear face chip dataset. We will use the bear face chip dataset to train a face recognition network following dlib’s High Quality Face Recognition with Deep Metric Learning. That’s where we will really put our deep learning machine (and this whole project) to the test.
If you know of good sources of bear images, where there bear in the image has been identified, please let us know in the comments section!
Until next time, SBD.